When you are building a circuit, the switch is more than just a button, it is the brain that directs your power. Choosing between SPST, SPDT, and DPDT is the difference between a project that works seamlessly and one that requires a complete redesign. Whether you are wiring a simple LED, reversing a motor, or building a guitar pedal, selecting the right configuration is your first step toward a professional build.
This guide cuts through the technical jargon to show you exactly how each switch functions, which one fits your specific logic, and how to avoid common wiring mistakes.
The Fundamental Logic of Poles and Throws
Before picking up your soldering iron, you need to understand the “shorthand” used by engineers. A switch is defined by two variables: Poles and Throws. Think of a Pole as the number of separate circuits the switch can control at once. Think of a Throw as the number of positions the switch can click into to complete a circuit.
Most beginners over-buy, picking a complex DPDT when a simple two-pin solution would be more elegant. By matching the switch logic to your specific project needs, you save space on your control panel and reduce the number of potential failure points in your wiring.
SPST: The Standard On-Off Solution
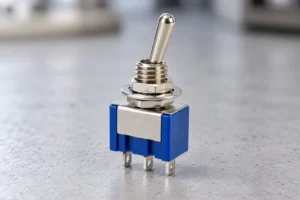
The Single Pole, Single Throw (SPST) is the most basic version of a Toggle Switch. It functions exactly like a gate: it is either open (breaking the circuit) or closed (completing the circuit). It features only two terminals.
When to Keep it Simple
- Master Power Control: If your goal is simply to turn a device on or off, this is your best bet. It is the most reliable way to ensure a battery-powered project isn’t draining juice while sitting on a shelf.
- Selection Checklist:
- Verify the Ampere rating. For high-draw items like heaters or large motors, ensure the switch is rated for at least 20% more current than the device pulls.
- Choose between “Maintained” (stays put) and “Momentary” (springs back) based on whether you want a constant power flow or a quick trigger.
- If you are mounting this on a guitar or a handheld device, look for a sub-miniature version to save internal cavity space.
SPDT: Managing Two-Way Traffic
The Single Pole, Double Throw (SPDT) switch has three terminals: one “Common” (input) and two “Outputs.” This allows you to divert electricity from one path to another. It is the perfect choice for devices that have two different modes of operation.
Routing Logic and Practical Tips
- A/B Testing and Indicators: Use an SPDT when you want to switch between two different functions, such as toggling a fan between “High” and “Low” speeds, or switching a status light from Red (Standby) to Green (Active).
- Installation Steps:
- Identify the center pin, which is almost always the Common/Input pin.
- Use a multimeter in continuity mode to see which side is active when the lever is flipped.
- If you only need an “On-Off” function but only have an SPDT on hand, you can simply leave one of the outer pins disconnected. It will function exactly like an SPST.
DPDT: The Multitasking Powerhouse
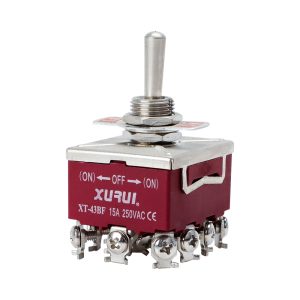
A Double Pole, Double Throw (DPDT) is essentially two SPDT switches housed in a single body, controlled by one lever. With six pins, it can control two completely independent circuits that never touch each other. This is a common feature in high-quality Toggle Switch designs used for industrial machinery.
Solving Complex Control Problems
- Reversing Motor Direction: By “cross-wiring” the four outer pins of a DPDT, you can swap the positive and negative leads of a DC motor. This allows you to change a robot’s direction from forward to reverse with a single flick.
- Bypassing Effects: In the world of audio and guitar pedals, a DPDT is often used for “True Bypass.” This allows the signal to go through an effect circuit in one position and completely skip it in the other, ensuring no signal loss.
- Pro-Level Advice:
- Always check for “Break-Before-Make” specifications. This ensures the first circuit is fully disconnected before the second one connects, preventing accidental shorts between two different power sources.
- Look for “Center-Off” models (On-Off-On) if you need a neutral safety position where neither circuit is receiving power.
Expert Selection Checklist
Choosing the right Toggle Switch requires looking past the pins. Before you hit the “Buy” button, run through this final check to ensure the hardware matches your environment:
- Check the Voltage Type: A switch rated for 12V DC may fail or melt if used for 120V AC household power. Always match the AC/DC rating to your power source.
- Mounting Hole Diameter: Ensure you have the right drill bit for your enclosure. Common sizes include 1/4 inch or 6mm for mini toggles.
- Environmental Sealing: If your project will be used outdoors or in a garage, look for a switch with a rubber “boot” or an IP67 rating to keep moisture out of the contacts.
Related Reading: Differences Between a Rocker Switch and a Toggle Switch
Final Thoughts
Selecting the right switch is about balancing functionality with simplicity. While it is tempting to use a complex DPDT “just in case,” the best designs use the simplest component that gets the job done. This keeps your wiring clean, reduces points of failure, and saves space.
Ultimately, your Toggle Switch is the primary interface between the user and the machine. By matching the pole and throw configuration to your specific logic—and double-checking your voltage and current ratings—you ensure a professional, reliable build. Start simple, wire accurately, and your circuit will stand the test of time.
Frequently Asked Questions
Can I use a DPDT switch if my diagram calls for an SPDT? Yes, you can. A DPDT is just two SPDTs in one box. You can simply use one side (three pins) and ignore the other three. This is a great way to use up extra parts in your bin.
Why does my switch have three positions (On-Off-On)? This is a specialized version of a Double Throw switch. The middle “Off” position is a safety feature that ensures no connection is made, which is vital for preventing accidental motor starts.
What is the difference between a Toggle Switch and a Rocker Switch? The difference is purely ergonomic. A toggle has a protruding lever, making it easier to flick without looking, while a rocker sits flatter and is less likely to be bumped accidentally.
Do I need to solder the wires, or can I use crimp connectors? Most full-sized switches have “Quick Disconnect” lugs that allow for crimping. However, for smaller miniature switches, soldering is usually required for a secure, low-resistance connection.
How do I know if my switch is UL Listed? Look for the “RU” or “UL” stamp on the side of the switch housing. In the US, using UL-listed components is highly recommended for any project that plugs into a wall outlet to ensure fire safety.
XURUI Engineering Team